.%20Just%20print%2C%20cut%2C%20fold%20glue%2C%20and%20add%20dots.%0A%23lego%20%23gift%20box "Pin It")
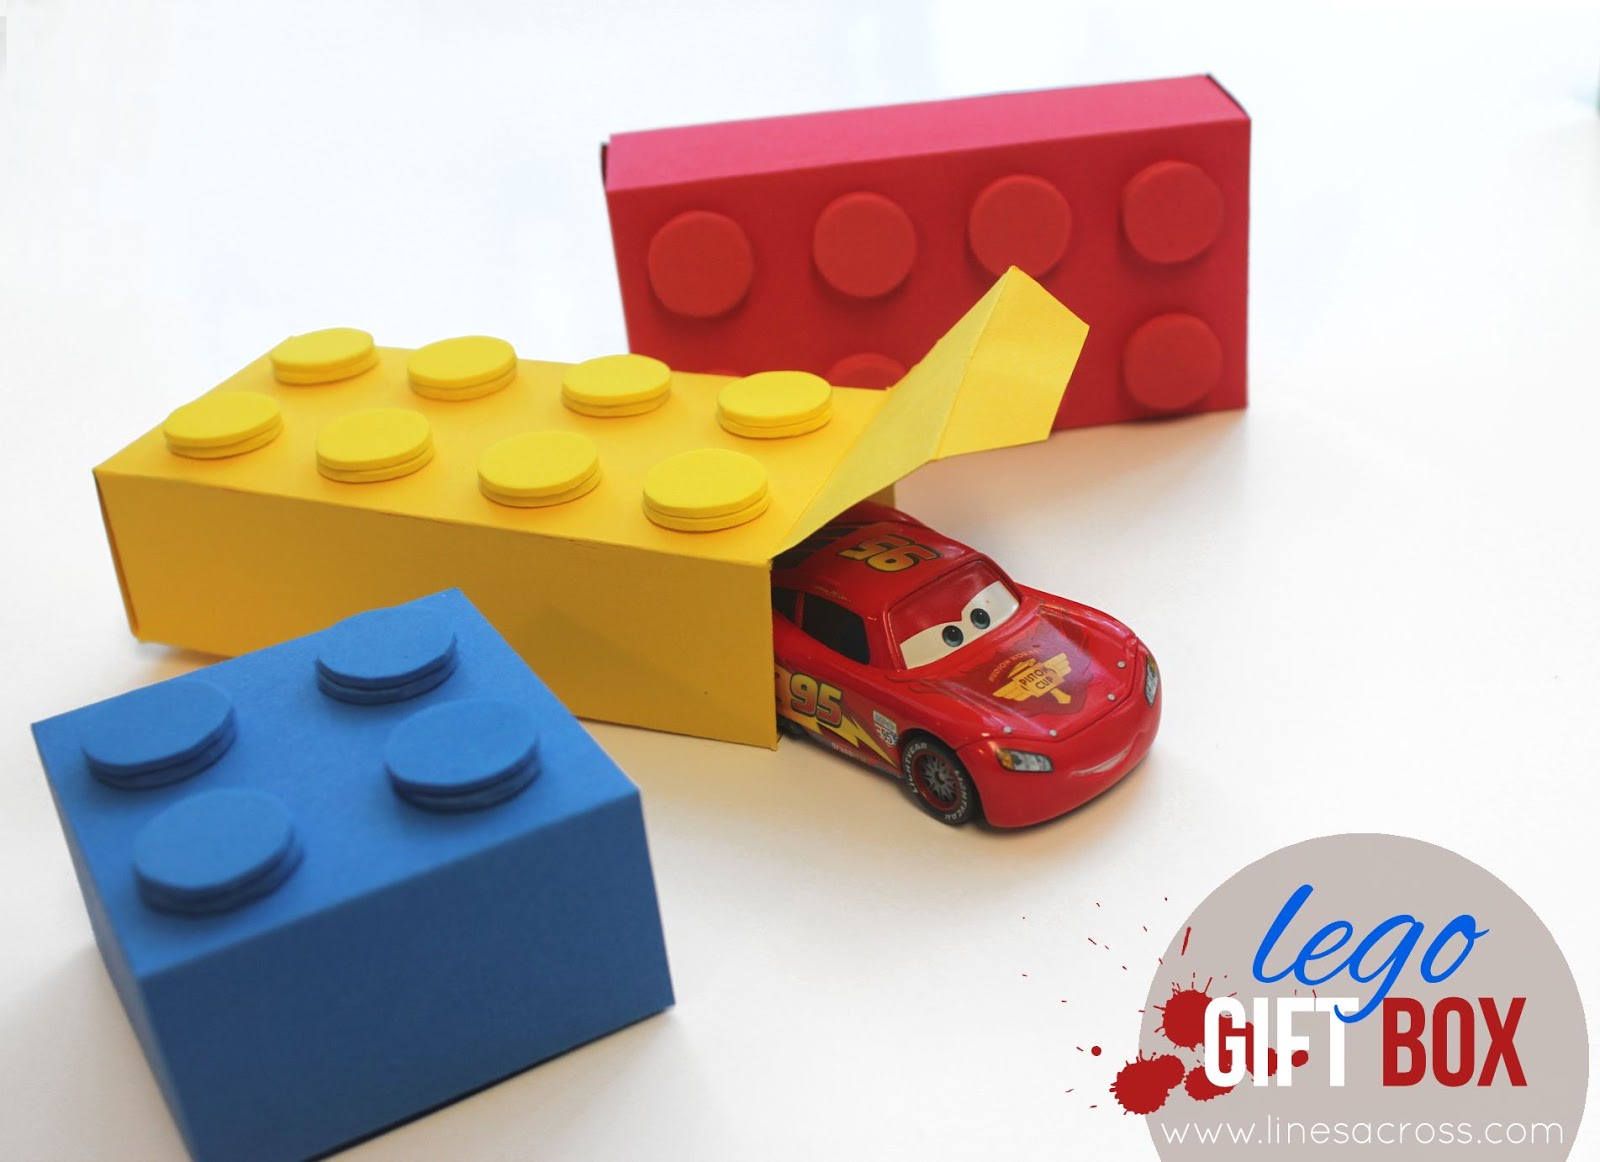
These lego gift boxes are really simple to make. I actually measured the exact dimensions of legos to get the template exactly right. You can print off a free template for either the large gift box, or the small one.
What you need:
1. Card Stock
2. Scissors
3. Glue (I used Elmer’s Dot Runner)
4. Craft Foam
5. Optional – a circle hole punch

What you do:
1. Print the template directly onto a piece of card stock.
2. Cut out the shape along the solid lines.
3. Fold and crease well along the dotted lines.
4. Put glue on the top half of the top flap (where the word glue is in this picture). I used Elmer’s Dot Runner (for the first time) and I am hooked. It was so easy to use and was perfect for this kind of paper craft. I would definitely recommend it. Otherwise, I would recommend using double sided tape or possibly a glue stick or even a small dab with a hot glue gun. Regular Elmer’s glue or tacky glue would take too long to dry for this project and could crinkle the paper.
5. Fold the top flap up and over the extra flap and secure.

6. Assemble the rest of the box (from here it should be very simple).
7. Now attach the circles to the top. I used thin craft foam and at first I used a paper punch. In the end, the paper punch was slightly too small for the foam and it kept getting stuck. So I ended out drawing circles on the foam (use the one included in the template) and cutting it out with precision scissors. I stacked two circles on top of each other for extra height. The next time I make some of these, I’m going to buy some of the very thick craft foam so I will only need one circle per spot.
8. I used the Elmer’s Dot Runner also to attach the circles. The nice thing about that was that you can peel them off and move them a little bit if you need to.


There are so many fun uses for these boxes. They are a great way to wrap up a gift for a little boy or girl. My son is obsessed with the ones I made. It would also be a fun way to package a party favor, especially at a Lego Birthday Party. You could even fill the Lego boxes with a handful of actual Legos.

Here are the two templates:
1. Large Lego Gift Box (8 Dots)
2. Small Lego Gift Box (4 Dots)
I’ve also created a smaller building block gift box template that is for sale. These are especially easy to make because you can use a standard single hole punch and craft foam to make the dots. They would make a perfect container to give money in, or make a cute party favor filled with little candy. Download and print over and over again. Please do not share the template online.

Great!!! 🙂
Thank you for this very very nice idea!!! 😉
ciao ciao
Chiara
Super cute, thanks for the template! Pinning!
Oh my gosh…these are SO cute!
Amazing!!! I think a big lego box version would make for great replacements for loot bags!!
Very cute! Perfect for a party!
What a clever idea. I love legos and these boxes are as cute as can be. Thanks for sharing the idea and template.
These are adorable – thanks for the instructions!
i love these! they would be perfect to use to stuff the whole stocking this year for the 2 boys. they would totally get a kick out of it.
Ok..my son thinks you totally ROCK!! these are fabulous!!!
thanks for sharing ~ I have a son who's going to love this 🙂
How cute! They are so adorable and great idea!
Seriously, these are SO SO SO cute! I am SO going to remember this for kids bday parties!!! Thank you SO much for always being such a great inspiration!
Jaime
So adorable! I'm excited to make these gift boxes for Christmas!
These are insanely cute! Can you do a post on how to convince your stubborn five year old to have a lego party? Thanks! : )
Your newest follower on face book.
Are you serious? My son would would LOVE these boxes. Thank you for the template. 🙂
what size card stock did you use? 12 x 12 or 8 x 11?
8.5 by 11. (Sorry I missed this question for so long!)
These are freakin' adorable! Nat and I both pinned them without the other one knowing because they are so cute! Hahaha, I can't wait to try these for my boys 🙂
Love this! Thank you so much 🙂 /Maree
Oh my goodness, does it get any cooler than this??! My boys are having a Lego Birthday Party in January and I'm definitely going to use these! Thanks for the template!
On my goodness, these are amazing! My kids would love them!
Thank you for the box templates and great directions!
I've found you on to pinterest. Absolout cool. I like it
THESE ARE AWESOME! Tons of Lego fans over at my blog. Would love for you to add this one, too! XO ellie
http://creativegeekery.blogspot.com/2013/04/starting-this-week-pin-it-party.html
These are fantastic. Thank you so much for sharing them!!!!!
sweet!!!, now i can make these for school to put paper clips and stuff in.
Thanks for the fantastic Lego template. Can't wait to put treats in them for lego fans.
Can you tell me how long it takes you to make one of these? Just curious with the cutting , folding, gluing time if it's realistic for me to make them! Thank you!
I would guess about 15 minutes per box, but if you are really fast it might take a little less time. Definitely they are a pretty quick DIY if you're making one or two, but if you're thinking about making a bunch for a party, they are a lot more time consuming. Hope that helps!
Cool
Good
Thanks so much! This was the perfect decoration for a lego-themed auction basket. I was in a rush so instead of cutting out the dots I used a circle punch to punch them from the extra cardstock, then applied them with 3-D foam adhesive squares so they popped out. It was really cute and super-fast. Thanks again!
That sounds like such a great idea! And such a time saver!
Hello
How thick should the card stock be?
I use 65lb card stock and it works great!
I’m the Editor of Fun Family Crafts and wanted to let you know that we have featured your Lego box! You can see it here:
http://funfamilycrafts.com/lego-gift-box/
If you have other kid-friendly craft tutorials, we’d love for you to submit them. If you would like to display a featured button on your site, you can get one from the right side bar of your post above. Thanks for a neat idea!