• Home
  • Blog
  • About
    • Contact
    • Contributors
    • Collaborate
    • The Newsletter
  • Crafts
    • Reader Favorites
    • Polymer Clay
    • Watercolors
    • Let’s Paint
    • Adult Coloring
    • Paper Crafts
    • Jewelry
    • Mod Podge
    • Flowers
    • Little Lines
    • Inspiration
  • Freebies
    • iPhone Wallpapers
    • Gift Boxes
  • Seasonal
    • Spring
    • Easter
    • Mother’s Day
    • Summer
    • Fall
    • Halloween
    • Christmas
  • Shop
    • 
    • 
    • 
    • 
    • 

Lines Across

Lets Make a Mess

DIY Triangle Gift Boxes

May 31, 2013 by Rachel 18 Comments

In case you haven’t caught on yet, I love geometric patterns and shapes. I also really enjoy making simple little paper gift boxes as a fun and personal way to give small gifts or house party favors.
These little boxes are very easy to make, and you probably already have everything you need at home. It shouldn’t take more than 5 minutes to make one.
What you need:
1. Card Stock
2. Scissors and a Ruler
3. Glue or Double Sided Tape (I used Elmer’s Dot Runner)
4. White Printer Paper
5. (Optional: Cute Washi Tape)
What you do:
1. Print the template onto cardstock
2. Cut out the template along the exterior black lines.
3. Use a ruler and scissors to score along the interior gray lines. This helps make the box more precise. If you’ve never scored before, basically you just run scissors or a dull knife lightly alongside of the ruler. Be careful not to put too much pressure, or you will cut straight through the paper.
4. Fold and crease along the scored lines.
5. Put glue along the inside of the box (see the video for better visual instructions). I used Elmer’s Dot Runner
because I’m obsessed with it. It is easy to use and holds well. You could also use double sided tape.
6. Assemble the box. (See the video for better visual instructions). Basically, you are just attaching the side with the glue to the other edge of the box, and then closing the lid.
7. Decorate. You can decorate in many ways, but I’ve also included free printable triangle patterns that I used in these gift boxes in the photos. You just print onto plain white printer paper, cut, and attach with double sided tape or dot runner.
8. Fill with a gift or party favors.
9. Gift and enjoy!

I had a lot of fun taking pictures of these boxes. I love seeing all of the colors and shapes side by side. My kids love these too. I actually made a few extras for my son to play with.

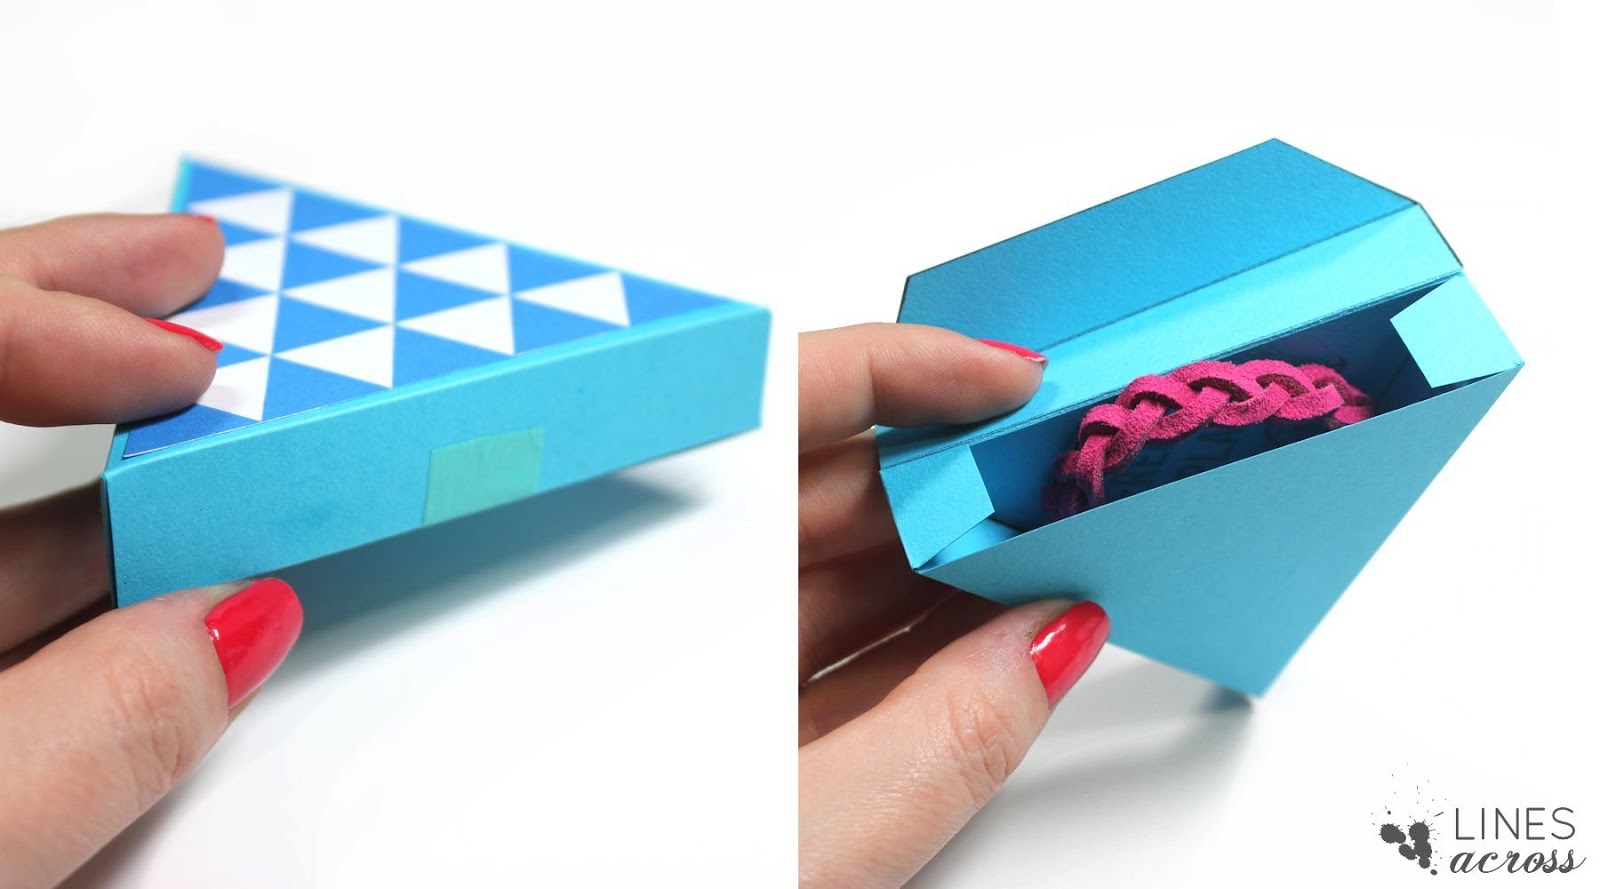
These are the perfect size for bracelets and jewelry (like these braided suede bracelets). I also added a little bit of matching washi tape to secure the lid.


Links to the templates:

Triangle Gift Boxes (2 boxes per 8.5 x 11 sheet of cardstock)

Geometric Gift Box Toppers Multicolored (12 triangles per 8.5 x 11 sheet of paper)


I also created some pages with just one color, in case you want to make a lot of the same color. Email me if you have a special color request, and I’ll see what I can do.

Black
Yellow
Orange
Raspberry
Blue
Turquoise
Red
Lime Green
Purple
Gray

About Rachel

Craft blogger. Color lover. Mess maker. Mom of three. You can find me at Lines Across sharing my creative adventures and tutorials on how to make stuff.

Monday Funday #19 – A Creative Link Party
Monday Funday #20 – A Creative Link Party

Comments

  1. Laura (TLN) says

    June 1, 2013 at 1:09 am

    Super cute! Thanks for sharing the tutorial!

    Reply
    • linesacross@gmail.com says

      June 2, 2013 at 11:04 pm

      Thanks Laura!

      Reply
  2. Katie says

    June 1, 2013 at 2:42 pm

    Love the boxes and the video great job!!!

    Reply
    • linesacross@gmail.com says

      June 2, 2013 at 11:05 pm

      Thanks Katie! I LOVE your videos too. You do a really great job with them. We need to work on planning a craft/sewing day soon!

      Reply
  3. Barbara Hiatt says

    June 2, 2013 at 11:02 pm

    These are so cute!! Love the vid too!

    Reply
    • linesacross@gmail.com says

      June 2, 2013 at 11:05 pm

      Thanks Barbara 🙂 I especially had fun making the video.

      Reply
  4. Lauren @ The Thinking Closet says

    June 4, 2013 at 3:51 am

    You already know I love these little boxes, and the video turned out great! I think you should consider becoming a hand model on the side (with all of your free time…wink wink).

    Reply
  5. Emily Morgenstern says

    June 4, 2013 at 2:16 pm

    Such cute boxes! And, great video. You're a pro 🙂

    Reply
  6. teenah says

    June 5, 2013 at 7:43 pm

    What a cute idea! I this they are awesome!

    Reply
  7. Anonymous says

    June 9, 2013 at 1:50 pm

    These are great. Your instructions are excellent and the video is a Wow!
    tkdla

    Reply
  8. Pam says

    September 19, 2013 at 6:31 am

    Beauties! Thanks for the tutorial. I might use a thin double sided tape for this one, that's the nearest item in my house that I can use so far. Also, I found a tutorial for DIY projects that use double sided tape, but gone wrong at some part that you need to remove the tape again. I can't finish a craft without spilling something or repeating a certain step (or worse, repeating the whole project!), so one tutorial might not worsen the aspiring DIY diva in me. Here's the link for you:

    http://www.digitalagetime.com/2013/06/24/how-to-remove-double-sided-masking-tape/

    Reply
  9. Nancy Weaver says

    September 26, 2013 at 4:26 am

    Oh my god!!!! This is so wonderful!! I totally love this idea and it is just so perfect because I am planning to give my friends a friendship bracelet and this box can be a great packaging for it. Thank you so much for sharing this. I will try making like those later. I am so excited! –http://www.paperboxco.com

    Reply
  10. Anonymous says

    November 7, 2013 at 12:01 pm

    At Christmas time they would look good in plain green card then decorated like a Christmas tree with circle stickers for baubles and a start on top.

    Reply
  11. Natalia McBlah says

    December 13, 2013 at 2:33 pm

    Can you please make the box in turqoise , raspberry and grey colour ? (:

    Reply
  12. Suspiro says

    April 9, 2014 at 11:12 pm

    Gracias por esta publicación,ha sido una bendición 🙂 Saludos desde México.

    Reply
  13. Joyce says

    March 1, 2015 at 4:24 am

    When I saw the shapes,the first thing I thought of was pizza (maybe because I'm hungry right now). They would be cute to decorate like pizza with little things inside to give away as a favor at a bithday pizza party for kids. Thanks for sharing.

    Reply
  14. jagriti says

    October 24, 2015 at 11:24 am

    i love these boxes i want to make these myself where can i get the measurements of the template

    Reply
    • Rachel says

      October 24, 2015 at 1:40 pm

      Thanks! There is a link to the free template in the post. You can just print the template directly onto a piece of standard cardstock and cut it out. No measurements are needed.

      Reply

Leave a Reply Cancel reply

Your email address will not be published. Required fields are marked *

Well hello! ••• I’m Rachel. Let’s Make a Mess.

Sign up for weekly updates and exclusive freebies.

Let’s Connect

  • 
  • 
  • 
  • 
  • 

Popular Posts

DIY Confetti – Make a Beautiful Mess

DIY Confetti – Make a Beautiful Mess

Dog and Cat Paper Gift Boxes

Dog and Cat Paper Gift Boxes

DIY Cross Hatch Stamp

DIY Cross Hatch Stamp

Recent Posts

  • DIY Wooden Pencil Cup
  • Weaving without a Loom
  • Unicorn Mason Jars
  • Our Little Adventure with Toyota Corolla
  • DIY Plant Stand
  • DIY Sidewalk Chalk Paint

Archives

Categories

Meta

  • Log in
  • Entries RSS
  • Comments RSS
  • WordPress.org
  • Home
  • Blog
  • About
  • Crafts
  • Freebies
  • Seasonal
  • Shop

© 2023 · Pretty Creative WordPress Theme by, Pretty Darn Cute Design